深浅模式
CSPHet
一、本文介绍
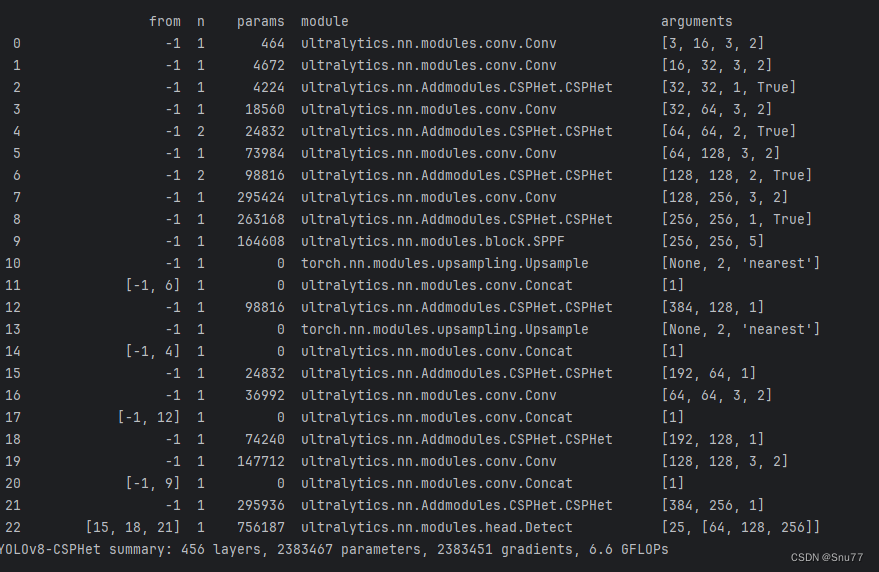
本文给大家带来的改进机制是我结合Dual的思想利用HetConv提出一种全新的结构CSPHet,我们将其用于替换我们的C2f结构,可以将参数降低越75W,GFLOPs降低至6.6GFLOPs,同时本文结构为我独家创新,全网无第二份,非常适合用于发表论文,该结构非常灵活,利用Dual卷积思想,结合异构内核卷积来并行处理图片,结构上的结合非常合理,同时该结构非常适合轻量化的读者。

二、HetConv原理

论文地址:官方论文地址
代码地址: 该结构为我从第三方库获取无官方地址

2.1 HetConv的基本原理
HetConv(异构内核卷积)是一种新型的深度学习架构,它采用了不同大小的卷积核来执行卷积操作。
HetConv(异构内核卷积)采用的基本原理如下:
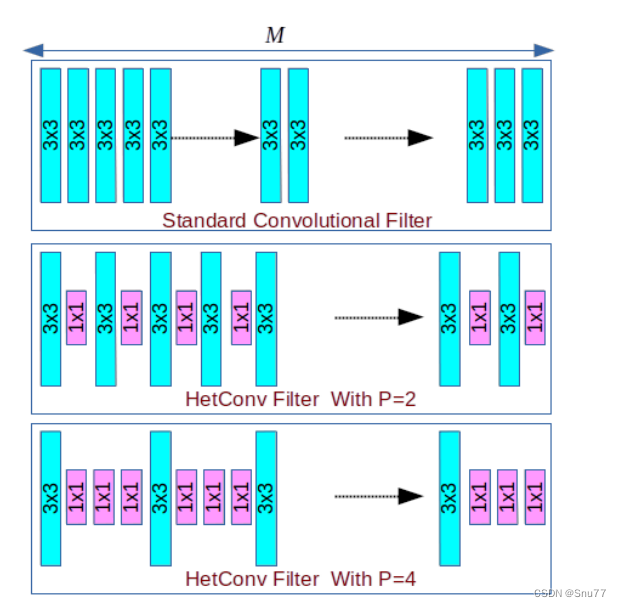
1. 异构内核:HetConv结合了不同大小的卷积核,如图所示,部分核为3x3,部分核为1x1。
2. 参数分区:在HetConv中,卷积核被分为几个部分,参数`P`代表了这些部分的数量。比如,当P=2时,意味着有一半的卷积核是3x3大小,另一半是1x1。
3. 计算效率:通过使用较小的1x1卷积核替代一部分3x3核,HetConv能够减少所需的浮点运算次数(FLOPs),从而提高计算效率。
4. 参数减少:由于1x1卷积核比3x3卷积核需要更少的参数,HetConv相比标准卷积操作能够减少模型的参数数量。
5. 保持表征能力:即使减少了计算量和参数,HetConv依然能够保持卷积神经网络的表征效率,不牺牲模型的准确性。
下面这张图展示了标准卷积滤波器和HetConv(异构内核卷积)滤波器之间的区别:
图中的HetConv使用了不同大小的内核,具体如下:
- 标准卷积滤波器:所有卷积核大小相同。
- HetConv滤波器(P=2):一半的卷积核为3x3,另一半为1x1。
- HetConv滤波器(P=4):四分之一的卷积核为3x3,剩余的为1x1。
其中M代表输入通道的数量,P代表将卷积核分为多少部分。当我们增加P的值时,使用1x1大小的卷积核的比例就会增加,这样可以减少计算量并减少模型参数,但同时也能保持必要的网络性能。通过这种设计,HetConv可以在减少计算复杂度和模型大小的同时,保持或提高模型准确性。
接下来这张图比较了HetConv(异构内核卷积)滤波器与其他高效的卷积滤波器:

HetConv滤波器的优势在于它的异构性能消除了延迟,而其他类型的卷积滤波器如组卷积加逐点卷积(GWC+PWC)或深度卷积加逐点卷积(DWC+PWC)至少有一个单元的延迟。
图中清晰地展示了不同卷积类型的结构差异,包括深度卷积、组卷积、标准卷积和HetConv提出的卷积滤波器。通过这种比较,我们可以理解HetConv如何在减少计算资源的同时,还能保持或提高处理速度。
三、CSPHet的核心代码
该代码的使用方式看章节四!
python
import torch
import torch.nn as nn


__all__ = ['CSPHet']


def autopad(k, p=None, d=1):  # kernel, padding, dilation
    """Pad to 'same' shape outputs."""
    if d > 1:
        k = d * (k - 1) + 1 if isinstance(k, int) else [d * (x - 1) + 1 for x in k]  # actual kernel-size
    if p is None:
        p = k // 2 if isinstance(k, int) else [x // 2 for x in k]  # auto-pad
    return p


class Conv(nn.Module):
    """Standard convolution with args(ch_in, ch_out, kernel, stride, padding, groups, dilation, activation)."""
    default_act = nn.SiLU()  # default activation

    def __init__(self, c1, c2, k=1, s=1, p=None, g=1, d=1, act=True):
        """Initialize Conv layer with given arguments including activation."""
        super().__init__()
        self.conv = nn.Conv2d(c1, c2, k, s, autopad(k, p, d), groups=g, dilation=d, bias=False)
        self.bn = nn.BatchNorm2d(c2)
        self.act = self.default_act if act is True else act if isinstance(act, nn.Module) else nn.Identity()

    def forward(self, x):
        """Apply convolution, batch normalization and activation to input tensor."""
        return self.act(self.bn(self.conv(x)))

    def forward_fuse(self, x):
        """Perform transposed convolution of 2D data."""
        return self.act(self.conv(x))


class HetConv(nn.Module):

    def __init__(self, input_channels, output_channels, stride=1, p=4):
        """
        Initialize the HetConv class.
        :param input_channels: the number of input channels
        :param output_channels: the number of output channels
        :param stride: convolution stride
        :param p: the value of P used in HetConv
        """
        super(HetConv, self).__init__()
        self.p = p
        self.input_channels = input_channels
        self.output_channels = output_channels
        self.filters = nn.ModuleList()
        self.convolution_1x1_index = []
        # Compute the indices of input channels fed to 1x1 convolutional kernels in all filters.
        # These indices of input channels are also the indices of the 1x1 convolutional kernels in the filters.
        # This is only executed when the HetConv class is created,
        # and the execution time is not included during inference.
        for i in range(self.p):
            self.convolution_1x1_index.append(self.compute_convolution_1x1_index(i))
        # Build HetConv filters.
        for i in range(self.p):
            self.filters.append(self.build_HetConv_filters(stride, p))

    def compute_convolution_1x1_index(self, i):
        """
        Compute the indices of input channels fed to 1x1 convolutional kernels in the i-th branch of filters (i=0, 1, 2,…, P-1). The i-th branch of filters consists of the {i, i+P, i+2P,…, i+N-P}-th filters.
        :param i: the i-th branch of filters in HetConv
        :return: return the required indices of input channels
        """
        index = [j for j in range(0, self.input_channels)]
        # Remove the indices of input channels fed to 3x3 convolutional kernels in the i-th branch of filters.
        while i < self.input_channels:
            index.remove(i)
            i += self.p
        return index

    def build_HetConv_filters(self, stride, p):
        """
        Build N/P filters in HetConv.
        :param stride: convolution stride
        :param p: the value of P used in HetConv
        :return: return N/P HetConv filters
        """
        temp_filters = nn.ModuleList()
        # nn.Conv2d arguments: nn.Conv2d(input_channels, output_channels, kernel_size, stride, padding)
        temp_filters.append(nn.Conv2d(self.input_channels//p, self.output_channels//p, 3, stride, 1, bias=False))
        temp_filters.append(nn.Conv2d(self.input_channels-self.input_channels//p, self.output_channels//p, 1, stride, 0, bias=False))
        return temp_filters

    def forward(self, input_data):
        """
        Define how HetConv processes the input images or input feature maps.
        :param input_data: input images or input feature maps
        :return: return output feature maps
        """
        output_feature_maps = []
        # Loop P times to get output feature maps. The number of output feature maps = the batch size.
        for i in range(0, self.p):

            # M/P HetConv filter kernels perform the 3x3 convolution and output to N/P output channels.
            output_feature_3x3 = self.filters[i][0](input_data[:, i::self.p, :, :])
            # (M-M/P) HetConv filter kernels perform the 1x1 convolution and output to N/P output channels.
            output_feature_1x1 = self.filters[i][1](input_data[:, self.convolution_1x1_index[i], :, :])

            # Obtain N/P output feature map channels.
            output_feature_map = output_feature_1x1 + output_feature_3x3

            # Append N/P output feature map channels.
            output_feature_maps.append(output_feature_map)

        # Get the batch size, number of output channels (N/P), height and width of output feature map.
        N, C, H, W = output_feature_maps[0].size()
        # Change the value of C to the number of output feature map channels (N).
        C = self.p * C
        # Arrange the output feature map channels to make them fit into the shifted manner.
        return torch.cat(output_feature_maps, 1).view(N, self.p, C//self.p, H, W).permute(0, 2, 1, 3, 4).contiguous().view(N, C, H, W)


class CSPHet_Bottleneck(nn.Module):
    def __init__(self, dim):
        super().__init__()
        self.DualPConv = nn.Sequential(HetConv(dim, dim), HetConv(dim, dim))

    def forward(self, x):
        return self.DualPConv(x)


class CSPHet(nn.Module):
    # CSP Bottleneck with 2 convolutions
    def __init__(self, c1, c2, n=1, shortcut=False, g=1, e=0.5):  # ch_in, ch_out, number, shortcut, groups, expansion
        super().__init__()
        self.c = int(c2 * e)  # hidden channels
        self.cv1 = Conv(c1, 2 * self.c, 1, 1)
        self.cv2 = Conv((2 + n) * self.c, c2, 1)  # optional act=FReLU(c2)
        self.m = nn.ModuleList(CSPHet_Bottleneck(self.c) for _ in range(n))

    def forward(self, x):
        y = list(self.cv1(x).split((self.c, self.c), 1))
        y.extend(m(y[-1]) for m in self.m)
        return self.cv2(torch.cat(y, 1))


if __name__ == "__main__":
    # Generating Sample image
    image_size = (1, 64, 224, 224)
    image = torch.rand(*image_size)

    # Model
    model = CSPHet(64, 128)

    out = model(image)
print(out.size())四、CSPHet的添加方式
4.1 修改一
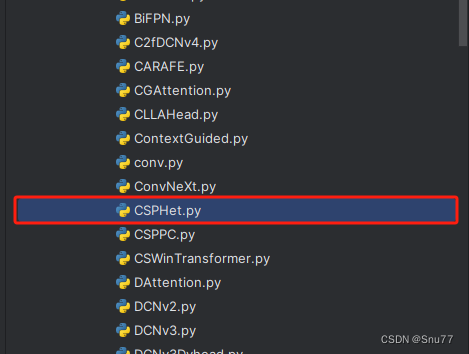
第一还是建立文件,我们找到如下ultralytics/nn/modules文件夹下建立一个目录名字呢就是'Addmodules'文件夹,然后在其内部建立一个新的py文件将核心代码复制粘贴进去即可。
4.2 修改二
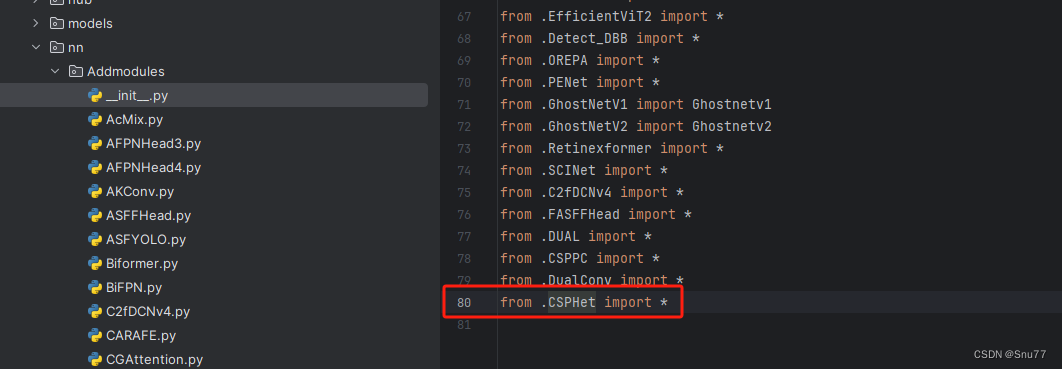
第二步我们在该目录下创建一个新的py文件名字为'__init__.py'(用群内的文件的话已经有了无需新建),然后在其内部导入我们的检测头如下图所示。
4.3 修改三
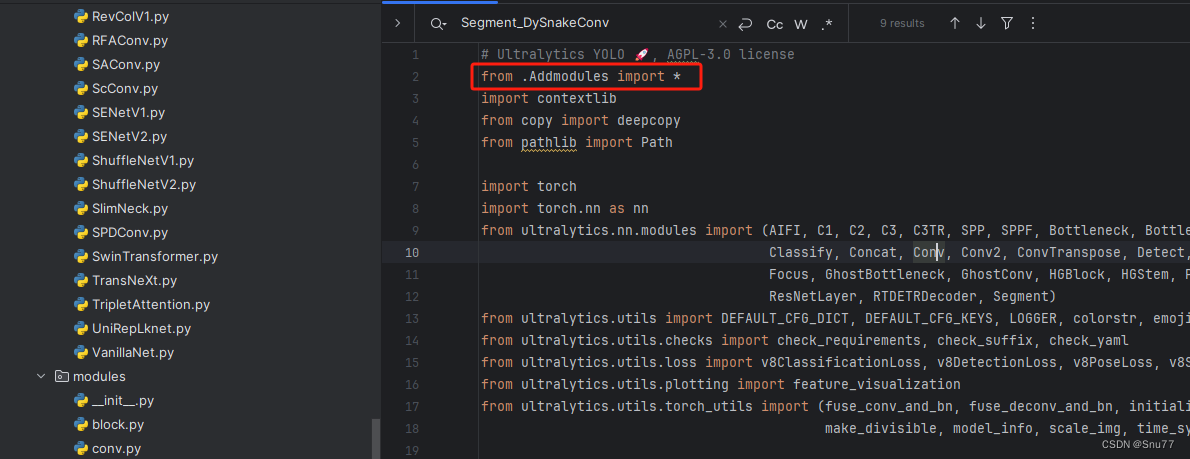
第三步我门中到如下文件'ultralytics/nn/tasks.py'进行导入和注册我们的模块。
4.4 修改四
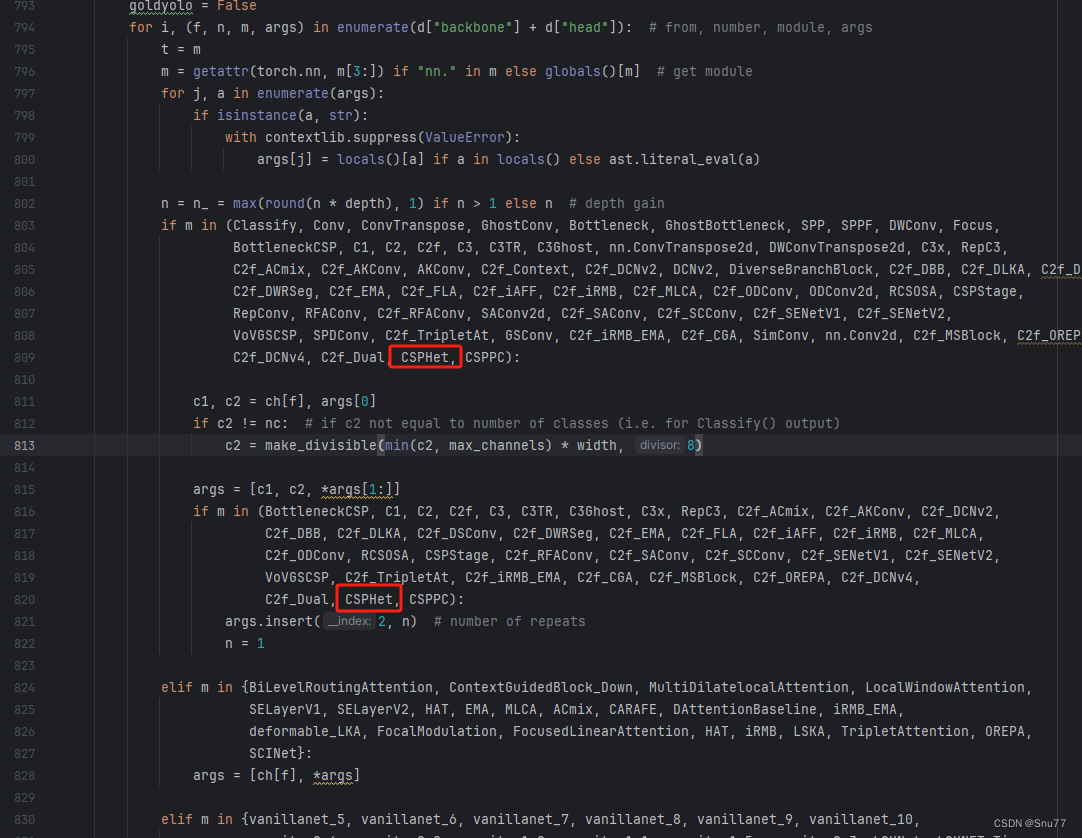
按照我的添加在parse_model里添加即可。
到此就修改完成了,大家可以复制下面的yaml文件运行。
五、CSPHet的yaml文件和运行记录
5.1 CSPHet的yaml文件
下面的添加CSPHet是我实验结果的版本,大家需要注意的是轻量化的结构往往模型收敛速度都会变慢因为模型变简单了,学习特征的能力变弱了,一般需要加大epochs训练的次数。
python
# Ultralytics YOLO 🚀, AGPL-3.0 license
# YOLOv8 object detection model with P3-P5 outputs. For Usage examples see https://docs.ultralytics.com/tasks/detect

# Parameters
nc: 80  # number of classes
scales:  # model compound scaling constants, i.e. 'model=yolov8n.yaml' will call yolov8.yaml with scale 'n'
  # [depth, width, max_channels]
  n: [0.33, 0.25, 1024]  # YOLOv8n summary: 225 layers,  3157200 parameters,  3157184 gradients,   8.9 GFLOPs
  s: [0.33, 0.50, 1024]  # YOLOv8s summary: 225 layers, 11166560 parameters, 11166544 gradients,  28.8 GFLOPs
  m: [0.67, 0.75, 768]   # YOLOv8m summary: 295 layers, 25902640 parameters, 25902624 gradients,  79.3 GFLOPs
  l: [1.00, 1.00, 512]   # YOLOv8l summary: 365 layers, 43691520 parameters, 43691504 gradients, 165.7 GFLOPs
  x: [1.00, 1.25, 512]   # YOLOv8x summary: 365 layers, 68229648 parameters, 68229632 gradients, 258.5 GFLOPs

# YOLOv8.0n backbone
backbone:
  # [from, repeats, module, args]
  - [-1, 1, Conv, [64, 3, 2]]  # 0-P1/2
  - [-1, 1, Conv, [128, 3, 2]]  # 1-P2/4
  - [-1, 3, CSPHet, [128, True]]
  - [-1, 1, Conv, [256, 3, 2]]  # 3-P3/8
  - [-1, 6, CSPHet, [256, True]]
  - [-1, 1, Conv, [512, 3, 2]]  # 5-P4/16
  - [-1, 6, CSPHet, [512, True]]
  - [-1, 1, Conv, [1024, 3, 2]]  # 7-P5/32
  - [-1, 3, CSPHet, [1024, True]]
  - [-1, 1, SPPF, [1024, 5]]  # 9

# YOLOv8.0n head
head:
  - [-1, 1, nn.Upsample, [None, 2, 'nearest']]
  - [[-1, 6], 1, Concat, [1]]  # cat backbone P4
  - [-1, 3, CSPHet, [512]]  # 12

  - [-1, 1, nn.Upsample, [None, 2, 'nearest']]
  - [[-1, 4], 1, Concat, [1]]  # cat backbone P3
  - [-1, 3, CSPHet, [256]]  # 15 (P3/8-small)

  - [-1, 1, Conv, [256, 3, 2]]
  - [[-1, 12], 1, Concat, [1]]  # cat head P4
  - [-1, 3, CSPHet, [512]]  # 18 (P4/16-medium)

  - [-1, 1, Conv, [512, 3, 2]]
  - [[-1, 9], 1, Concat, [1]]  # cat head P5
  - [-1, 3, CSPHet, [1024]]  # 21 (P5/32-large)

- [[15, 18, 21], 1, Detect, [nc]] # Detect(P3, P4, P5)5.2 CSPHet的训练过程截图
