深浅模式
DynamicConv
一、本文介绍
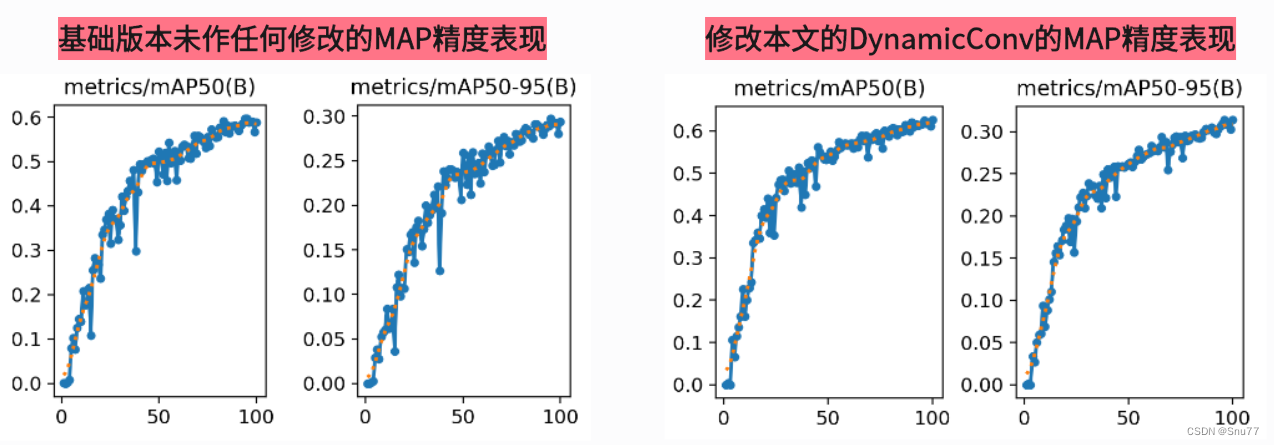
本文给大家带来的改进机制是CVPR2024的最新改进机制DynamicConv其是CVPR2024的最新改进机制,这个论文中介绍了一个名为ParameterNet的新型设计原则,它旨在在大规模视觉预训练模型中增加参数数量,同时尽量不增加浮点运算(FLOPs),所以本文的DynamicConv被提出来了,使得网络在保持低FLOPs的同时增加参数量,从而允许这些网络从大规模视觉预训练中获益,下面的图片为V8n和利用了DynamicConv的训练精度对比图,本文内容包含详细教程 + 代码 + 原理介绍。
二、原理介绍

官方论文地址: 官方论文地址点击此处即可跳转
官方代码地址: 官方代码地址点击此处即可跳转
动态卷积(Dynamic Convolution)是《DynamicConv.pdf》中提出的一种关键技术,旨在增加网络的参数量而几乎不增加额外的浮点运算(FLOPs)。以下是关于动态卷积的主要信息和原理:
主要原理:
1. 动态卷积的定义:
动态卷积通过对每个输入样本动态选择或组合不同的卷积核(称为"experts"),来处理输入数据。这种方法可以视为是对传统卷积操作的扩展,它允许网络根据输入的不同自适应地调整其参数。
2. 参数和计算的动态化:
在动态卷积中,不是为所有输入使用固定的卷积核,而是有多个卷积核(或参数集),并且根据输入的特性动态选择使用哪个核。
这种选择通过一个学习得到的函数(例如,使用多层感知机(MLP)和softmax函数)来动态生成控制各个卷积核贡献的权重。
3. 计算过程:
给定输入特征
每个专家的贡献由一个动态系数
输出
其中
动态卷积的优点:
- 参数效率高:通过共享和动态组合卷积核,动态卷积可以在增加极少的计算成本的情况下显著增加模型的参数量。
- 适应性强:由于卷积核是针对每个输入动态选择的,这种方法可以更好地适应不同的输入特征,理论上可以提高模型的泛化能力。
- 资源使用优化:动态卷积允许模型在资源有限的环境中(如移动设备)部署更复杂的网络结构,而不会显著增加计算负担。
动态卷积的设计思想突破了传统卷积网络结构的限制,通过动态调整和优化计算资源的使用,实现了在低FLOPs条件下提升网络性能的目标,这对于需要在计算资源受限的设备上运行高效AI模型的应用场景尤为重要。
三、核心代码
本节核心代码的使用方式看章节四!
python
"""
An implementation of GhostNet Model as defined in:
GhostNet: More Features from Cheap Operations. https://arxiv.org/abs/1911.11907
The train script of the model is similar to that of MobileNetV3
Original model: https://github.com/huawei-noah/CV-backbones/tree/master/ghostnet_pytorch
"""
import math
from functools import partial
import torch
import torch.nn as nn
import torch.nn.functional as F
from timm.layers import drop_path, SqueezeExcite
from timm.models.layers import CondConv2d, hard_sigmoid, DropPath

__all__ = ['C2f_GhostModule_DynamicConv']

_SE_LAYER = partial(SqueezeExcite, gate_fn=hard_sigmoid, divisor=4)


class DynamicConv(nn.Module):
    """ Dynamic Conv layer
    """

    def __init__(self, in_features, out_features, kernel_size=1, stride=1, padding='', dilation=1,
                 groups=1, bias=False, num_experts=4):
        super().__init__()
        self.routing = nn.Linear(in_features, num_experts)
        self.cond_conv = CondConv2d(in_features, out_features, kernel_size, stride, padding, dilation,
                                    groups, bias, num_experts)

    def forward(self, x):
        pooled_inputs = F.adaptive_avg_pool2d(x, 1).flatten(1)  # CondConv routing
        routing_weights = torch.sigmoid(self.routing(pooled_inputs))
        x = self.cond_conv(x, routing_weights)
        return x


class ConvBnAct(nn.Module):
    """ Conv + Norm Layer + Activation w/ optional skip connection
    """

    def __init__(
            self, in_chs, out_chs, kernel_size, stride=1, dilation=1, pad_type='',
            skip=False, act_layer=nn.ReLU, norm_layer=nn.BatchNorm2d, drop_path_rate=0., num_experts=4):
        super(ConvBnAct, self).__init__()
        self.has_residual = skip and stride == 1 and in_chs == out_chs
        self.drop_path_rate = drop_path_rate
        # self.conv = create_conv2d(in_chs, out_chs, kernel_size, stride=stride, dilation=dilation, padding=pad_type)
        self.conv = DynamicConv(in_chs, out_chs, kernel_size, stride, dilation=dilation, padding=pad_type,
                                num_experts=num_experts)
        self.bn1 = norm_layer(out_chs)
        self.act1 = act_layer()

    def feature_info(self, location):
        if location == 'expansion':  # output of conv after act, same as block coutput
            info = dict(module='act1', hook_type='forward', num_chs=self.conv.out_channels)
        else:  # location == 'bottleneck', block output
            info = dict(module='', hook_type='', num_chs=self.conv.out_channels)
        return info

    def forward(self, x):
        shortcut = x
        x = self.conv(x)
        x = self.bn1(x)
        x = self.act1(x)
        if self.has_residual:
            if self.drop_path_rate > 0.:
                x = drop_path(x, self.drop_path_rate, self.training)
            x += shortcut
        return x


class GhostModule(nn.Module):
    def __init__(self, inp, oup, kernel_size=1, ratio=2, dw_size=3, stride=1, act_layer=nn.ReLU, num_experts=4):
        super(GhostModule, self).__init__()
        self.oup = oup
        init_channels = math.ceil(oup / ratio)
        new_channels = init_channels * (ratio - 1)

        self.primary_conv = nn.Sequential(
            DynamicConv(inp, init_channels, kernel_size, stride, kernel_size // 2, bias=False, num_experts=num_experts),
            nn.BatchNorm2d(init_channels),
            act_layer() if act_layer is not None else nn.Sequential(),
        )

        self.cheap_operation = nn.Sequential(
            DynamicConv(init_channels, new_channels, dw_size, 1, dw_size // 2, groups=init_channels, bias=False,
                        num_experts=num_experts),
            nn.BatchNorm2d(new_channels),
            act_layer() if act_layer is not None else nn.Sequential(),
        )

    def forward(self, x):
        x1 = self.primary_conv(x)
        x2 = self.cheap_operation(x1)
        out = torch.cat([x1, x2], dim=1)
        return out[:, :self.oup, :, :]


class GhostBottleneck(nn.Module):
    """ Ghost bottleneck w/ optional SE"""

    def __init__(self, in_chs, out_chs, dw_kernel_size=3,
                 stride=1, act_layer=nn.ReLU, se_ratio=0., drop_path=0., num_experts=4):
        super(GhostBottleneck, self).__init__()
        has_se = se_ratio is not None and se_ratio > 0.
        self.stride = stride
        mid_chs = in_chs * 2
        # Point-wise expansion
        self.ghost1 = GhostModule(in_chs, mid_chs, act_layer=act_layer, num_experts=num_experts)

        # Depth-wise convolution
        if self.stride > 1:
            self.conv_dw = nn.Conv2d(
                mid_chs, mid_chs, dw_kernel_size, stride=stride,
                padding=(dw_kernel_size - 1) // 2, groups=mid_chs, bias=False)
            self.bn_dw = nn.BatchNorm2d(mid_chs)
        else:
            self.conv_dw = None
            self.bn_dw = None

        # Squeeze-and-excitation
        self.se = _SE_LAYER(mid_chs, se_ratio=se_ratio,
                            act_layer=act_layer if act_layer is not nn.GELU else nn.ReLU) if has_se else None

        # Point-wise linear projection
        self.ghost2 = GhostModule(mid_chs, out_chs, act_layer=None, num_experts=num_experts)

        # shortcut
        if in_chs == out_chs and self.stride == 1:
            self.shortcut = nn.Sequential()
        else:
            self.shortcut = nn.Sequential(
                DynamicConv(
                    in_chs, in_chs, dw_kernel_size, stride=stride,
                    padding=(dw_kernel_size - 1) // 2, groups=in_chs, bias=False, num_experts=num_experts),
                nn.BatchNorm2d(in_chs),
                DynamicConv(in_chs, out_chs, 1, stride=1, padding=0, bias=False, num_experts=num_experts),
                nn.BatchNorm2d(out_chs),
            )

        self.drop_path = DropPath(drop_path) if drop_path > 0. else nn.Identity()

    def forward(self, x):
        shortcut = x

        # 1st ghost bottleneck
        x = self.ghost1(x)

        # Depth-wise convolution
        if self.conv_dw is not None:
            x = self.conv_dw(x)
            x = self.bn_dw(x)

        # Squeeze-and-excitation
        if self.se is not None:
            x = self.se(x)

        # 2nd ghost bottleneck
        x = self.ghost2(x)

        x = self.shortcut(shortcut) + self.drop_path(x)
        return x


def autopad(k, p=None, d=1):  # kernel, padding, dilation
    """Pad to 'same' shape outputs."""
    if d > 1:
        k = d * (k - 1) + 1 if isinstance(k, int) else [d * (x - 1) + 1 for x in k]  # actual kernel-size
    if p is None:
        p = k // 2 if isinstance(k, int) else [x // 2 for x in k]  # auto-pad
    return p


class Conv(nn.Module):
    """Standard convolution with args(ch_in, ch_out, kernel, stride, padding, groups, dilation, activation)."""
    default_act = nn.SiLU()  # default activation

    def __init__(self, c1, c2, k=1, s=1, p=None, g=1, d=1, act=True):
        """Initialize Conv layer with given arguments including activation."""
        super().__init__()
        self.conv = nn.Conv2d(c1, c2, k, s, autopad(k, p, d), groups=g, dilation=d, bias=False)
        self.bn = nn.BatchNorm2d(c2)
        self.act = self.default_act if act is True else act if isinstance(act, nn.Module) else nn.Identity()

    def forward(self, x):
        """Apply convolution, batch normalization and activation to input tensor."""
        return self.act(self.bn(self.conv(x)))

    def forward_fuse(self, x):
        """Perform transposed convolution of 2D data."""
        return self.act(self.conv(x))

class C2f_GhostModule_DynamicConv(nn.Module):
    # CSP Bottleneck with 2 convolutions
    def __init__(self, c1, c2, n=1, shortcut=False, g=1, e=0.5):  # ch_in, ch_out, number, shortcut, groups, expansion
        super().__init__()
        self.c = int(c2 * e)  # hidden channels
        self.cv1 = Conv(c1, 2 * self.c, 1, 1)
        self.cv2 = Conv((2 + n) * self.c, c2, 1)  # optional act=FReLU(c2)
        self.m = nn.ModuleList(GhostModule(self.c, self.c) for _ in range(n))

    def forward(self, x):
        y = list(self.cv1(x).split((self.c, self.c), 1))
        y.extend(m(y[-1]) for m in self.m)
        return self.cv2(torch.cat(y, 1))


if __name__ == "__main__":
    # Generating Sample image
    image_size = (1, 64, 224, 224)
    image = torch.rand(*image_size)

    # Model
    model = C2f_GhostModule_DynamicConv(64, 64)

    out = model(image)
print(out.size())四、手把手教你添加DynamicConv机制
4.1 修改一
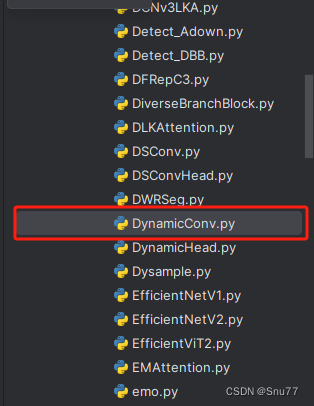
第一还是建立文件,我们找到如下ultralytics/nn文件夹下建立一个目录名字呢就是'Addmodules'文件夹,然后在其内部建立一个新的py文件将核心代码复制粘贴进去即可。
4.2 修改二
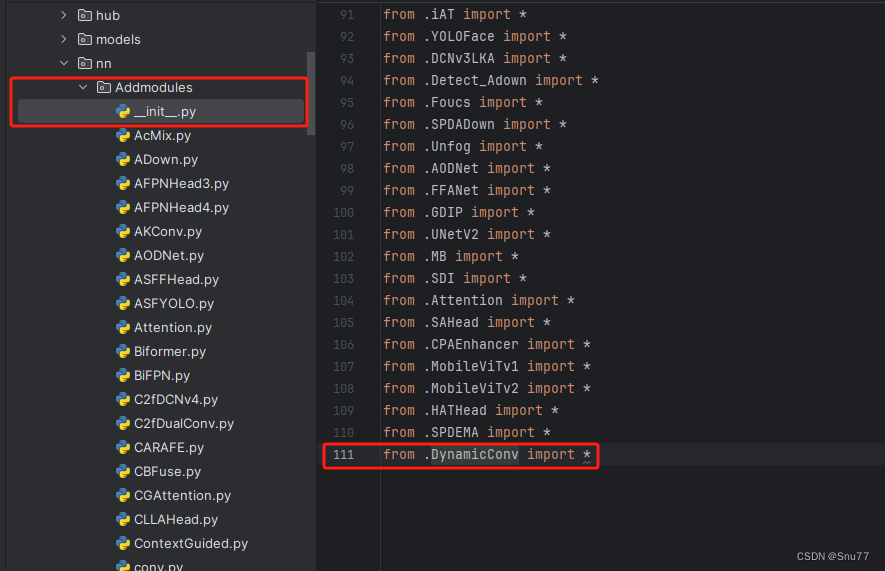
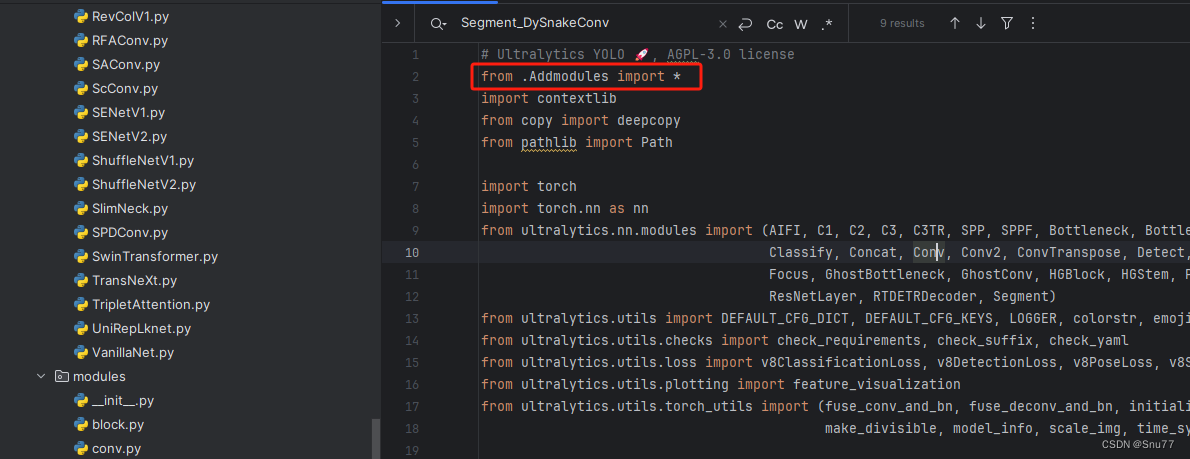
第二步我们在该目录下创建一个新的py文件名字为'__init__.py',然后在其内部导入我们的检测头如下图所示。
4.3 修改三
第三步我门中到如下文件'ultralytics/nn/tasks.py'进行导入和注册我们的模块。
从今天开始以后的教程就都统一成这个样子了,因为我默认大家用了我群内的文件来进行修改!!
4.4 修改四
按照我的添加在parse_model里添加即可。
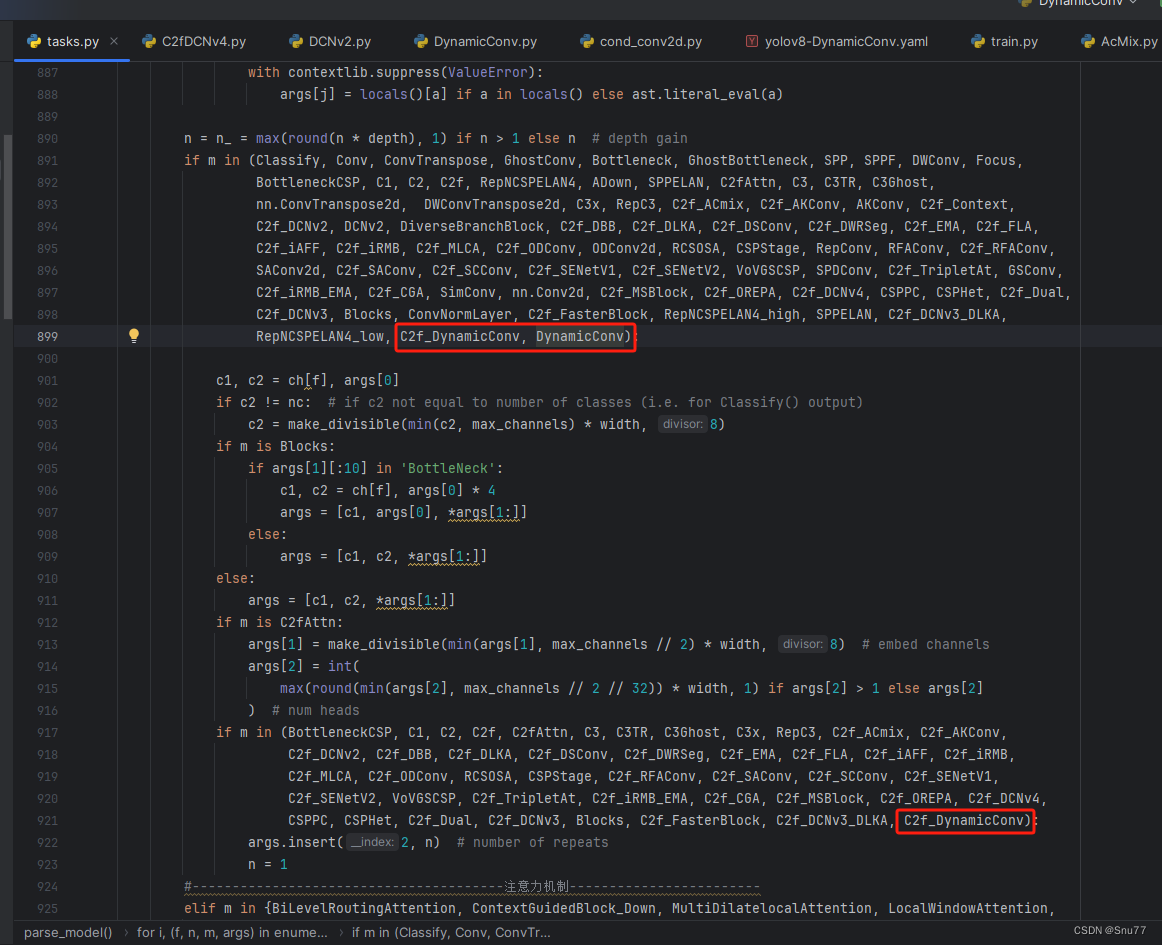
到此就修改完成了,大家可以复制下面的yaml文件运行。
五、DynamicConv的yaml文件和运行记录
5.1 DynamicConv的yaml文件1
主干和Neck全部用上该卷积轻量化到机制的yaml文件。
python
# Ultralytics YOLO 🚀, AGPL-3.0 license
# YOLOv8 object detection model with P3-P5 outputs. For Usage examples see https://docs.ultralytics.com/tasks/detect

# Parameters
nc: 80  # number of classes
scales: # model compound scaling constants, i.e. 'model=yolov8n.yaml' will call yolov8.yaml with scale 'n'
  # [depth, width, max_channels]
  n: [0.33, 0.25, 1024]  # YOLOv8n summary: 225 layers,  3157200 parameters,  3157184 gradients,   8.9 GFLOPs
  s: [0.33, 0.50, 1024]  # YOLOv8s summary: 225 layers, 11166560 parameters, 11166544 gradients,  28.8 GFLOPs
  m: [0.67, 0.75, 768]   # YOLOv8m summary: 295 layers, 25902640 parameters, 25902624 gradients,  79.3 GFLOPs
  l: [1.00, 1.00, 512]   # YOLOv8l summary: 365 layers, 43691520 parameters, 43691504 gradients, 165.7 GFLOPs
  x: [1.00, 1.25, 512]   # YOLOv8x summary: 365 layers, 68229648 parameters, 68229632 gradients, 258.5 GFLOP

# YOLOv8.0n backbone
backbone:
  # [from, repeats, module, args]
  - [-1, 1, Conv, [64, 3, 2]]  # 0-P1/2
  - [-1, 1, DynamicConv, [128, 3, 2]]  # 1-P2/4
  - [-1, 3, C2f, [128, True]]
  - [-1, 1, DynamicConv, [256, 3, 2]]  # 3-P3/8
  - [-1, 6, C2f, [256, True]]
  - [-1, 1, DynamicConv, [512, 3, 2]]  # 5-P4/16
  - [-1, 6, C2f, [512, True]]
  - [-1, 1, DynamicConv, [1024, 3, 2]]  # 7-P5/32
  - [-1, 3, C2f, [1024, True]]
  - [-1, 1, SPPF, [1024, 5]]  # 9

# YOLOv8.0n head
head:
  - [-1, 1, nn.Upsample, [None, 2, 'nearest']]
  - [[-1, 6], 1, Concat, [1]]  # cat backbone P4
  - [-1, 3, C2f, [512]]  # 12

  - [-1, 1, nn.Upsample, [None, 2, 'nearest']]
  - [[-1, 4], 1, Concat, [1]]  # cat backbone P3
  - [-1, 3, C2f, [256]]  # 15 (P3/8-small)


  - [-1, 1, DynamicConv, [256, 3, 2]]
  - [[-1, 12], 1, Concat, [1]]  # cat head P4
  - [-1, 3, C2f, [512]]  # 18 (P4/16-medium)


  - [-1, 1, DynamicConv, [512, 3, 2]]
  - [[-1, 9], 1, Concat, [1]]  # cat head P5
  - [-1, 3, C2f, [1024]]  # 21 (P5/32-large)

- [[15, 18, 21], 1, Detect, [nc]] # Detect(P3, P4, P5)5.2 DynamicConv的yaml文件2
创新C2f的yaml文件2
python
# Ultralytics YOLO 🚀, AGPL-3.0 license
# YOLOv8 object detection model with P3-P5 outputs. For Usage examples see https://docs.ultralytics.com/tasks/detect

# Parameters
nc: 80  # number of classes
scales: # model compound scaling constants, i.e. 'model=yolov8n.yaml' will call yolov8.yaml with scale 'n'
  # [depth, width, max_channels]
  n: [0.33, 0.25, 1024]  # YOLOv8n summary: 225 layers,  3157200 parameters,  3157184 gradients,   8.9 GFLOPs
  s: [0.33, 0.50, 1024]  # YOLOv8s summary: 225 layers, 11166560 parameters, 11166544 gradients,  28.8 GFLOPs
  m: [0.67, 0.75, 768]   # YOLOv8m summary: 295 layers, 25902640 parameters, 25902624 gradients,  79.3 GFLOPs
  l: [1.00, 1.00, 512]   # YOLOv8l summary: 365 layers, 43691520 parameters, 43691504 gradients, 165.7 GFLOPs
  x: [1.00, 1.25, 512]   # YOLOv8x summary: 365 layers, 68229648 parameters, 68229632 gradients, 258.5 GFLOP

# YOLOv8.0n backbone
backbone:
  # [from, repeats, module, args]
  - [-1, 1, Conv, [64, 3, 2]]  # 0-P1/2
  - [-1, 1, Conv, [128, 3, 2]]  # 1-P2/4
  - [-1, 3, C2f_DynamicConv, [128, True]]
  - [-1, 1, Conv, [256, 3, 2]]  # 3-P3/8
  - [-1, 6, C2f_DynamicConv, [256, True]]
  - [-1, 1, Conv, [512, 3, 2]]  # 5-P4/16
  - [-1, 6, C2f_DynamicConv, [512, True]]
  - [-1, 1, Conv, [1024, 3, 2]]  # 7-P5/32
  - [-1, 3, C2f_DynamicConv, [1024, True]]
  - [-1, 1, SPPF, [1024, 5]]  # 9

# YOLOv8.0n head
head:
  - [-1, 1, nn.Upsample, [None, 2, 'nearest']]
  - [[-1, 6], 1, Concat, [1]]  # cat backbone P4
  - [-1, 3, C2f_DynamicConv, [512]]  # 12

  - [-1, 1, nn.Upsample, [None, 2, 'nearest']]
  - [[-1, 4], 1, Concat, [1]]  # cat backbone P3
  - [-1, 3, C2f_DynamicConv, [256]]  # 15 (P3/8-small)


  - [-1, 1, Conv, [256, 3, 2]]
  - [[-1, 12], 1, Concat, [1]]  # cat head P4
  - [-1, 3, C2f_DynamicConv, [512]]  # 18 (P4/16-medium)


  - [-1, 1, Conv, [512, 3, 2]]
  - [[-1, 9], 1, Concat, [1]]  # cat head P5
  - [-1, 3, C2f_DynamicConv, [1024]]  # 21 (P5/32-large)

- [[15, 18, 21], 1, Detect, [nc]] # Detect(P3, P4, P5)5.3 训练代码
大家可以创建一个py文件将我给的代码复制粘贴进去,配置好自己的文件路径即可运行。
python
import warnings
warnings.filterwarnings('ignore')
from ultralytics import YOLO

if __name__ == '__main__':
    model = YOLO('ultralytics/cfg/models/v8/yolov8-C2f-FasterBlock.yaml')
    # model.load('yolov8n.pt') # loading pretrain weights
    model.train(data=r'替换数据集yaml文件地址',
                # 如果大家任务是其它的'ultralytics/cfg/default.yaml'找到这里修改task可以改成detect, segment, classify, pose
                cache=False,
                imgsz=640,
                epochs=150,
                single_cls=False,  # 是否是单类别检测
                batch=4,
                close_mosaic=10,
                workers=0,
                device='0',
                optimizer='SGD', # using SGD
                # resume='', # 如过想续训就设置last.pt的地址
                amp=False,  # 如果出现训练损失为Nan可以关闭amp
                project='runs/train',
                name='exp',
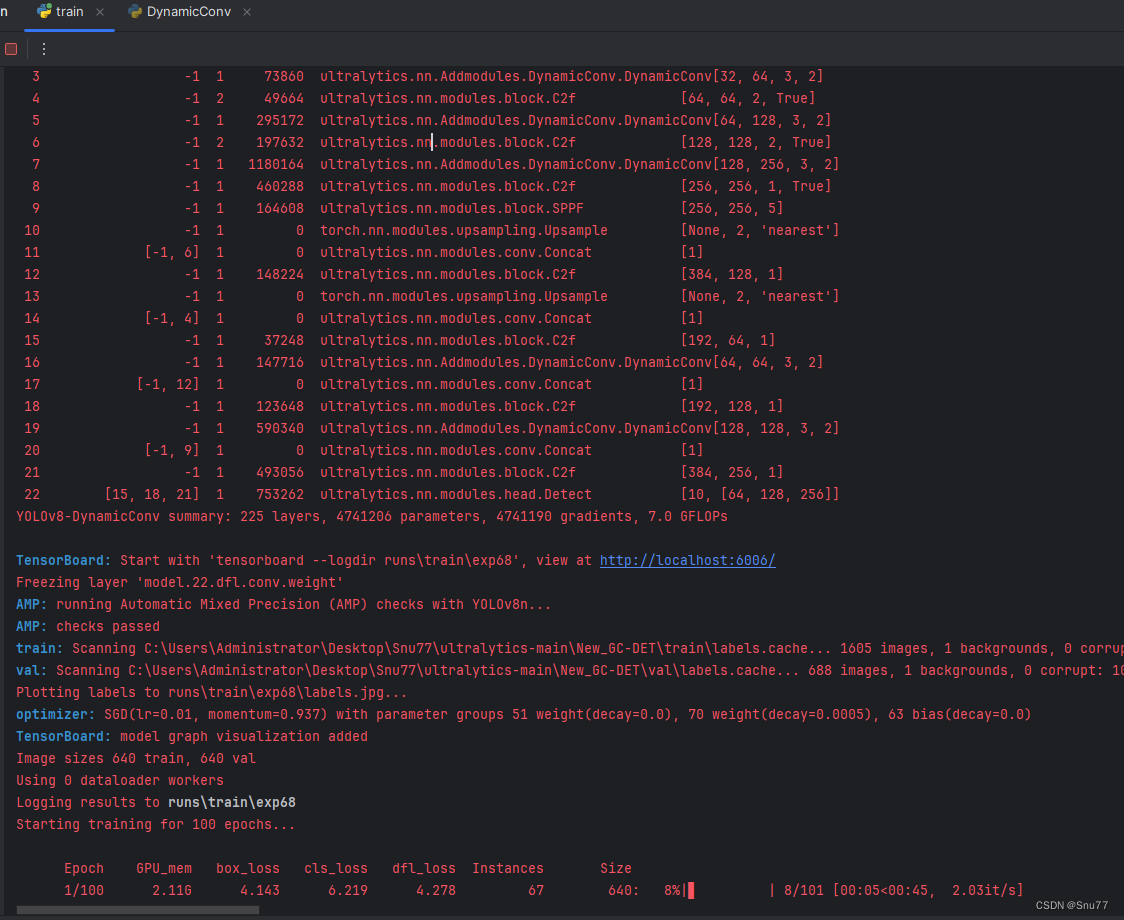
)5.4 DynamicConv的训练过程截图
