深浅模式
动态蛇形卷积(💯)
一、本文介绍
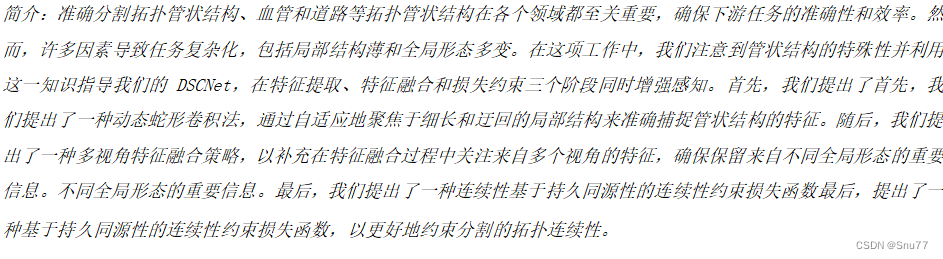
动态蛇形卷积的灵感来源于对管状结构的特殊性的观察和理解,在分割拓扑管状结构、血管和道路等类型的管状结构时,任务的复杂性增加,因为这些结构的局部结构可能非常细长和迂回,而整体形态也可能多变。
因此为了应对这个挑战,作者研究团队注意到了管状结构的特殊性,并提出了动态蛇形卷积(Dynamic Snake Convolution)这个方法。动态蛇形卷积通过自适应地聚焦于细长和迂回的局部结构,准确地捕捉管状结构的特征。这种卷积方法的核心思想是,通过动态形状的卷积核来增强感知能力,针对管状结构的特征提取进行优化。
总之动态蛇形卷积是一种针对管状结构分割任务的创新方法,在许多模型上添加针对一些数据集都能够有效的涨点,其具有重要性和广泛的应用领域。
动态蛇形卷积(Dynamic Snake Convolution)适用于多种模型,可以在多种模型上添加或替换该卷积,本文主要针对的改进模型是YOLOv8模型,并修复动态蛇形卷积官方代码中存在的BUG例如: Expected all tensors to be on the same device, but found at least two devices, cuda:0 and cpu!修复,同时以此来进行示例帮助大家理解和掌握动态蛇形卷积和YOLOv8模型。
二、动态蛇形卷积背景和原理

论文代码地址:动态蛇形卷积官方代码下载地址
论文地址:动态蛇形卷积(DynamicSnakeConvolution)
背景:动态蛇形卷积(Dynamic Snake Convolution)来源于临床医学,清晰勾画血管是计算流体力学研究的关键前提,并能协助放射科医师进行诊断和定位病变。在遥感应用中,完整的道路分割为路径规划提供了坚实的基础。无论是哪个领域,这些结构都具有细长和曲折的共同特征,使得它们很难在图像中捕捉到,因为它们在图像中的比例很小。因此,迫切需要提升对细长管状结构的感知能力,所以在这一背景下作者提出了动态蛇形卷积(Dynamic Snake Convolution)。
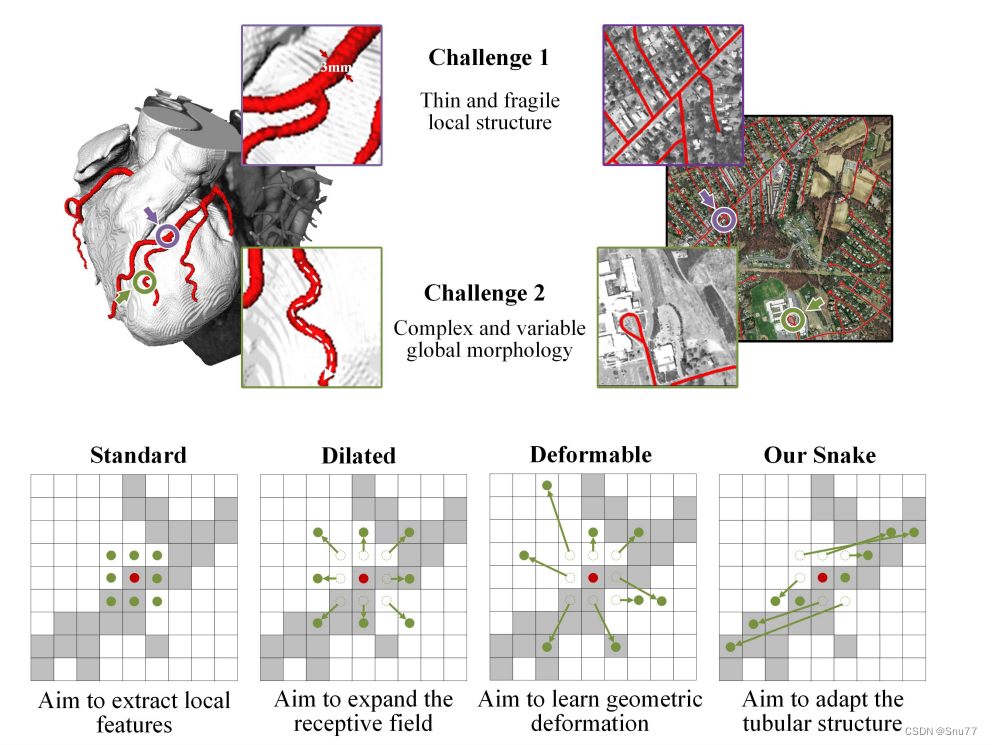
原理->上图展示了一个三维心脏血管数据集和一个二维远程道路数据集。这两个数据集旨在提取管状结构,但由于脆弱的局部结构和复杂的整体形态,这个任务面临着挑战。标准的卷积核旨在提取局部特征。基于此,设计了可变形卷积核以丰富它们的应用,并适应不同目标的几何变形。然而,由于前面提到的挑战,有效地聚焦于细小的管状结构是困难的。
由于以下困难,这仍然是一个具有挑战性的任务:
细小而脆弱的局部结构:如上面的图所示,细小的结构仅占整体图像的一小部分,并且由于像素组成有限,这些结构容易受到复杂背景的干扰,使模型难以精确地区分目标的细微变化。因此,模型可能难以区分这些结构,导致分割结果出现断裂。
复杂而多变的整体形态:上面的图片展示了细小管状结构的复杂和多变形态,即使在同一图像中也如此。不同区域中的目标呈现出形态上的变化,包括分支数量、分叉位置和路径长度等。当数据呈现出前所未见的形态结构时,模型可能会过度拟合已经见过的特征,导致在新的形态结构下泛化能力较弱。
为了应对上述障碍,提出了如下解决方案,其中包括管状感知卷积核、多视角特征融合策略和拓扑连续性约束损失函数。具体如下:
1. 针对细小且脆弱的局部结构所占比例小且难以聚焦的挑战,提出了动态蛇形卷积,通过自适应地聚焦于管状结构的细长曲线局部特征,增强对几何结构的感知。与可变形卷积不同,DSConv考虑到管状结构的蛇形形态,并通过约束补充自由学习过程,有针对性地增强对管状结构的感知。
2. 针对复杂和多变的整体形态的挑战,提出了一种多视角特征融合策略。在该方法中,基于DSConv生成多个形态学卷积核模板,从不同角度观察目标的结构特征,并通过总结典型的重要特征实现高效的特征融合。
3. 针对管状结构分割容易出现断裂的问题,提出了基于持久同调(Persistent Homology,PH)的拓扑连续性约束损失函数(TCLoss)。PH是一种从出现到消失的拓扑特征响应过程,能够从嘈杂的高维数据中获取足够的拓扑信息。相关的贝蒂数是描述拓扑空间连通性的一种方式。与其他方法不同,TCLoss将PH与点集相似性相结合,引导网络关注具有异常像素/体素分布的断裂区域,从拓扑角度实现连续性约束。
总结:为了克服挑战,提出了DSCNet框架,包括管状感知卷积核、多视角特征融合策略和拓扑连续性约束损失函数。DSConv增强了对细长曲线特征的感知,多视角特征融合策略提高了对复杂整体形态的处理能力,而TCLoss基于持久同调实现了从拓扑角度的连续性约束。
三、动态蛇形卷积的优势
为了提高对管状结构的性能,已经提出了各种方法,根据管状结构的形态设计了特定的网络架构和模块。具体如下:
1. 基于卷积核设计的方法:著名的扩张卷积(dilated convolution)和可变形卷积(deformable convolution)等方法被提出来处理卷积神经网络中固有的几何变换限制,并在复杂的检测和分割任务中取得了出色的表现。这些方法还被设计用于动态感知对象的几何特征,以适应具有可变形态的结构。例如,DUNet。
2. 基于形态学的方法:一些方法专注于利用形态学信息来处理管状结构。例如,形态学重建网络(Morphological Reconstruction Network)利用形态学重建操作来重建管状结构,从而实现更准确的分割。另外,形态学操作如开运算和闭运算也被广泛应用于处理管状结构。
3. 基于拓扑学的方法:拓扑学方法被用来处理管状结构的拓扑特征。例如,基于持久同调(Persistent Homology)的方法可以从高维数据中获取拓扑信息,并用于分析管状结构的连通性和形态特征。
总结:为了处理管状结构,已经提出了多种方法。这些方法包括基于卷积核设计的方法、基于形态学的方法和基于拓扑学的方法。这些方法的目标是通过设计适应管状结构形态的网络架构和模块,提高对管状结构的检测和分割性能。
优势:以上所述的方法都只是从单一的角度去分析,DSConv提出了一种多角度特征融合策略,从多个角度补充对重要特征的关注。在这个策略中,基于动态蛇形卷积(DSConv)生成多个形态学卷积核模板,从多个角度观察目标的结构特征,并通过总结关键的标准特征实现特征融合,从而提高我们模型的性能。
四、实验和结果
4.1 数据集
使用了三个数据集来验证我们的框架,其中包括两个公开数据集和一个内部数据集。在2D方面,评估了DRIVE视网膜数据集和马萨诸塞道路数据集。在3D方面,使用了一个名为Cardiac CCTA Data的数据集。
4.2 实验
进行了比较实验和消融研究,以证明DSCN的优势。与经典的分割网络U-Net 和2021年提出的用于血管分割的CS2-Net 进行比较,以验证准确性。为了验证网络设计性能,将2022年提出的用于视网膜血管分割的DCU-Net 进行了比较。为了验证特征融合的优势,将2021年提出的用于医学图像分割的Transunet 进行了比较。为了验证损失函数约束,将2021年提出的clDice和基于Wasserstein距离的TCLoss LWTC进行了比较。这些模型在相同的数据集上进行训练,并进行了精确的实现,通过以下指标进行评估。所有指标都是针对每个图像进行计算并求平均。
1. 体积得分:使用平均Dice系数(Dice)、相对Dice系数(RDice)、中心线Dice(clDice)、准确度(ACC)和AUC来评估结果的性能。
2. 拓扑错误:计算基于拓扑的得分,包括Betti数β0和β1的Betti错误。同时,为了客观验证冠状动脉分割的连续性,使用直到第一个错误的重叠(OF)来评估提取的中心线的完整性。
3. 距离错误:Hausdorff距离(HD)也被广泛用于描述两组点之间的相似性,推荐用于评估薄管状结构的相似性。
4.3 实验结果
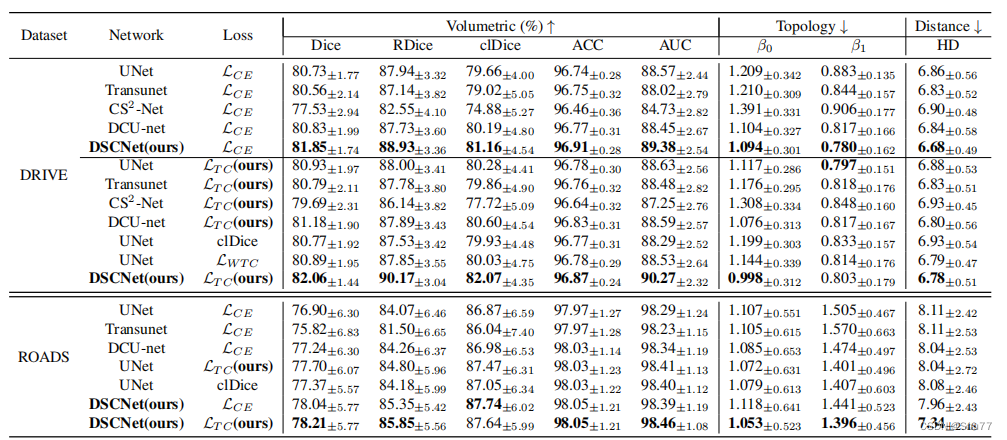
在下面的表格中展示了DSCNet方法在每个指标上的优势,结果表明提出的DSCNet在2D和3D数据集上取得了更好的结果。
在DRIVE数据集上的评估中,DSCNet在分割准确性和拓扑连续性方面均优于其他模型。在下面的表格中,与其他方法相比,DSCNet在体积准确性方面取得了最佳的分割结果,Dice系数为82.06%,RDice系数为90.17%,clDice系数为82.07%,准确度为96.87%,AUC为90.27%。同时,从拓扑的角度来看,与其他方法相比,DSCNet在拓扑连续性上取得了最好的结果,β0错误为0.998,β1错误为0.803。结果显示,DSCNet方法更好地捕捉了薄管状结构的特征,并展现出更准确的分割性能和更连续的拓扑结构。正如表格1中第6行到第12行所示,在引入TCLoss后,不同的模型在分割的拓扑连续性方面均有所改善。结果表明,TCLoss能够准确地约束模型关注失去拓扑连续性的薄管状结构。在ROADS数据集上的评估中,DSCNet同样取得了最佳结果。如表格1所示,与其他方法相比,提出的带有TCLoss的DSCNet在分割结果上取得了最佳的效果,Dice系数为78.21%,RDice系数为85.85%,clDice系数为87.64%。与经典的分割网络UNet的结果相比,DSCNet的方法在Dice系数、RDice系数和clDice系数上分别改善了最多1.31%、1.78%和0.77%。结果显示,与其他模型相比,DSCNet的模型在结构复杂且形态多变的道路数据集上也表现良好。
在CORONARY数据集上的评估中,验证了DSCNet在3D薄管状结构分割任务上仍然取得了最佳结果。如下面的表格所示,与其他方法相比,提出的DSCNet在分割结果上取得了最佳的效果,Dice系数为80.27%,RDice系数为86.37%,clDice系数为85.26%。与经典的分割网络UNet的结果相比,DSCNet方法在Dice系数、RDice系数和clDice系数上分别改善了最多3.40%、1.89%和3.83%。同时,使用OF指标来评估分割的连续性。使用DSCNet的方法,LAD的OF指标提升了6.00%,LCX的OF指标提升了3.78%,而RCA的OF指标提升了3.30%
 4.4 有效性展示
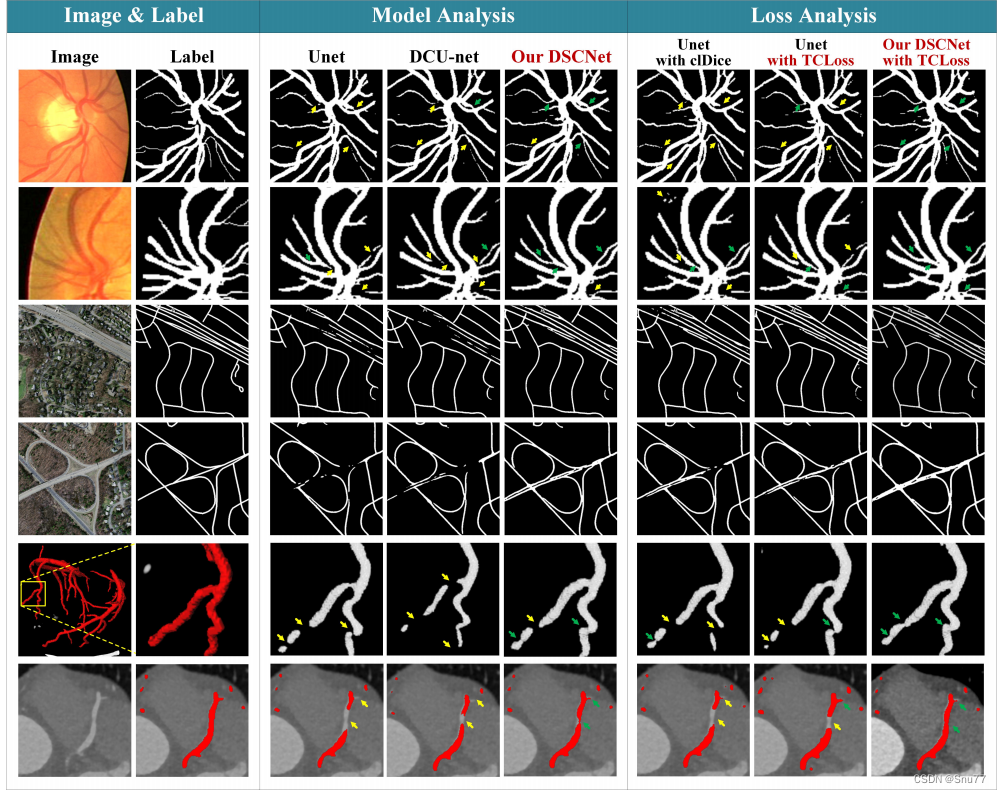
DSCNet和TCLoss在各个方面都具有决定性的视觉优势。
(1) 为了展示DSCNet的有效性下面的图片中。从左到右,第三到第五列展示了不同网络在分割准确性方面的表现。由于DSConv能够自适应地感知关键特征,DSCNet的方法在分割结果上表现出色。与其他方法相比,DSCNet的方法能够更好地捕捉和保留薄管状结构的细节。
(2) 为了验证DSCNet的TCLoss的有效性,第六列展示了在没有使用TCLoss的情况下的分割结果。可以看出,没有TCLoss的方法在拓扑连续性方面存在明显的问题,而DSCNet的方法能够通过TCLoss准确地约束分割结果的拓扑结构,使得分割结果更加连续。
(3) 在第七列和第八列中,展示了DSCNet在不同数据集上的分割结果。可以看到,DSCNet在DRIVE和ROADS数据集上都能取得准确且连续的分割结果,进一步证明了DSCNet的通用性和鲁棒性。
总的来说,从图6可以清楚地看到我们的DSCNet和TCLoss在分割准确性和拓扑连续性方面的显著优势,这进一步证明了我们方法的有效性和优越性。
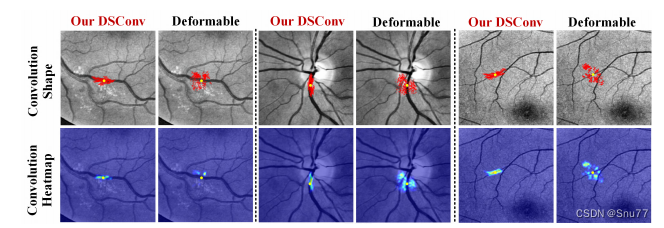
DSConv能够动态地适应管状结构的形状,并且注意力能够很好地适配目标。
(1) 适应管状结构的形状。下面的图片中的顶部显示了卷积核的位置和形状。可视化结果显示,DSConv能够很好地适应管状结构并保持形状,而可变形卷积则在目标外部游走。
(2) 关注管状结构的位置。下面的图片的底部显示了给定点的注意力热力图。结果显示,DSConv最亮的区域集中在管状结构上,这表示DSConv对管状结构更加敏感。
这些结果表明,我们的DSConv能够有效地适应和关注管状结构,从而使得DSCNet能够更好地捕捉和分割这些结构。
五、核心代码
使用方式看章节六
python
import torch
import torch.nn as nn
from ..modules.conv import Conv


class DySnakeConv(nn.Module):
    def __init__(self, inc, ouc, k=3) -> None:
        super().__init__()

        self.conv_0 = Conv(inc, ouc, k)
        self.conv_x = DSConv(inc, ouc, 0, k)
        self.conv_y = DSConv(inc, ouc, 1, k)

    def forward(self, x):
        return torch.cat([self.conv_0(x), self.conv_x(x), self.conv_y(x)], dim=1)


class DSConv(nn.Module):
    def __init__(self, in_ch, out_ch, morph, kernel_size=3, if_offset=True, extend_scope=1):
        """
        The Dynamic Snake Convolution
        :param in_ch: input channel
        :param out_ch: output channel
        :param kernel_size: the size of kernel
        :param extend_scope: the range to expand (default 1 for this method)
        :param morph: the morphology of the convolution kernel is mainly divided into two types
                        along the x-axis (0) and the y-axis (1) (see the paper for details)
        :param if_offset: whether deformation is required, if it is False, it is the standard convolution kernel
        """
        super(DSConv, self).__init__()
        # use the <offset_conv> to learn the deformable offset
        self.offset_conv = nn.Conv2d(in_ch, 2 * kernel_size, 3, padding=1)
        self.bn = nn.BatchNorm2d(2 * kernel_size)
        self.kernel_size = kernel_size

        # two types of the DSConv (along x-axis and y-axis)
        self.dsc_conv_x = nn.Conv2d(
            in_ch,
            out_ch,
            kernel_size=(kernel_size, 1),
            stride=(kernel_size, 1),
            padding=0,
        )
        self.dsc_conv_y = nn.Conv2d(
            in_ch,
            out_ch,
            kernel_size=(1, kernel_size),
            stride=(1, kernel_size),
            padding=0,
        )

        self.gn = nn.GroupNorm(out_ch // 4, out_ch)
        self.act = Conv.default_act

        self.extend_scope = extend_scope
        self.morph = morph
        self.if_offset = if_offset

    def forward(self, f):
        offset = self.offset_conv(f)
        offset = self.bn(offset)
        # We need a range of deformation between -1 and 1 to mimic the snake's swing
        offset = torch.tanh(offset)
        input_shape = f.shape
        dsc = DSC(input_shape, self.kernel_size, self.extend_scope, self.morph)
        deformed_feature = dsc.deform_conv(f, offset, self.if_offset)
        if self.morph == 0:
            x = self.dsc_conv_x(deformed_feature.type(f.dtype))
            x = self.gn(x)
            x = self.act(x)
            return x
        else:
            x = self.dsc_conv_y(deformed_feature.type(f.dtype))
            x = self.gn(x)
            x = self.act(x)
            return x


# Core code, for ease of understanding, we mark the dimensions of input and output next to the code
class DSC(object):
    def __init__(self, input_shape, kernel_size, extend_scope, morph):
        self.num_points = kernel_size
        self.width = input_shape[2]
        self.height = input_shape[3]
        self.morph = morph
        self.extend_scope = extend_scope  # offset (-1 ~ 1) * extend_scope

        # define feature map shape
        """
        B: Batch size  C: Channel  W: Width  H: Height
        """
        self.num_batch = input_shape[0]
        self.num_channels = input_shape[1]

    """
    input: offset [B,2*K,W,H]  K: Kernel size (2*K: 2D image, deformation contains <x_offset> and <y_offset>)
    output_x: [B,1,W,K*H]   coordinate map
    output_y: [B,1,K*W,H]   coordinate map
    """

    def _coordinate_map_3D(self, offset, if_offset):
        device = offset.device
        # offset
        y_offset, x_offset = torch.split(offset, self.num_points, dim=1)

        y_center = torch.arange(0, self.width).repeat([self.height])
        y_center = y_center.reshape(self.height, self.width)
        y_center = y_center.permute(1, 0)
        y_center = y_center.reshape([-1, self.width, self.height])
        y_center = y_center.repeat([self.num_points, 1, 1]).float()
        y_center = y_center.unsqueeze(0)

        x_center = torch.arange(0, self.height).repeat([self.width])
        x_center = x_center.reshape(self.width, self.height)
        x_center = x_center.permute(0, 1)
        x_center = x_center.reshape([-1, self.width, self.height])
        x_center = x_center.repeat([self.num_points, 1, 1]).float()
        x_center = x_center.unsqueeze(0)

        if self.morph == 0:
            """
            Initialize the kernel and flatten the kernel
                y: only need 0
                x: -num_points//2 ~ num_points//2 (Determined by the kernel size)
                !!! The related PPT will be submitted later, and the PPT will contain the whole changes of each step
            """
            y = torch.linspace(0, 0, 1)
            x = torch.linspace(
                -int(self.num_points // 2),
                int(self.num_points // 2),
                int(self.num_points),
            )

            y, x = torch.meshgrid(y, x)
            y_spread = y.reshape(-1, 1)
            x_spread = x.reshape(-1, 1)

            y_grid = y_spread.repeat([1, self.width * self.height])
            y_grid = y_grid.reshape([self.num_points, self.width, self.height])
            y_grid = y_grid.unsqueeze(0)  # [B*K*K, W,H]

            x_grid = x_spread.repeat([1, self.width * self.height])
            x_grid = x_grid.reshape([self.num_points, self.width, self.height])
            x_grid = x_grid.unsqueeze(0)  # [B*K*K, W,H]

            y_new = y_center + y_grid
            x_new = x_center + x_grid

            y_new = y_new.repeat(self.num_batch, 1, 1, 1).to(device)
            x_new = x_new.repeat(self.num_batch, 1, 1, 1).to(device)

            y_offset_new = y_offset.detach().clone()

            if if_offset:
                y_offset = y_offset.permute(1, 0, 2, 3)
                y_offset_new = y_offset_new.permute(1, 0, 2, 3)
                center = int(self.num_points // 2)

                # The center position remains unchanged and the rest of the positions begin to swing
                # This part is quite simple. The main idea is that "offset is an iterative process"
                y_offset_new[center] = 0
                for index in range(1, center):
                    y_offset_new[center + index] = (y_offset_new[center + index - 1] + y_offset[center + index])
                    y_offset_new[center - index] = (y_offset_new[center - index + 1] + y_offset[center - index])
                y_offset_new = y_offset_new.permute(1, 0, 2, 3).to(device)
                y_new = y_new.add(y_offset_new.mul(self.extend_scope))

            y_new = y_new.reshape(
                [self.num_batch, self.num_points, 1, self.width, self.height])
            y_new = y_new.permute(0, 3, 1, 4, 2)
            y_new = y_new.reshape([
                self.num_batch, self.num_points * self.width, 1 * self.height
            ])
            x_new = x_new.reshape(
                [self.num_batch, self.num_points, 1, self.width, self.height])
            x_new = x_new.permute(0, 3, 1, 4, 2)
            x_new = x_new.reshape([
                self.num_batch, self.num_points * self.width, 1 * self.height
            ])
            return y_new, x_new

        else:
            """
            Initialize the kernel and flatten the kernel
                y: -num_points//2 ~ num_points//2 (Determined by the kernel size)
                x: only need 0
            """
            y = torch.linspace(
                -int(self.num_points // 2),
                int(self.num_points // 2),
                int(self.num_points),
            )
            x = torch.linspace(0, 0, 1)

            y, x = torch.meshgrid(y, x)
            y_spread = y.reshape(-1, 1)
            x_spread = x.reshape(-1, 1)

            y_grid = y_spread.repeat([1, self.width * self.height])
            y_grid = y_grid.reshape([self.num_points, self.width, self.height])
            y_grid = y_grid.unsqueeze(0)

            x_grid = x_spread.repeat([1, self.width * self.height])
            x_grid = x_grid.reshape([self.num_points, self.width, self.height])
            x_grid = x_grid.unsqueeze(0)

            y_new = y_center + y_grid
            x_new = x_center + x_grid

            y_new = y_new.repeat(self.num_batch, 1, 1, 1)
            x_new = x_new.repeat(self.num_batch, 1, 1, 1)

            y_new = y_new.to(device)
            x_new = x_new.to(device)
            x_offset_new = x_offset.detach().clone()

            if if_offset:
                x_offset = x_offset.permute(1, 0, 2, 3)
                x_offset_new = x_offset_new.permute(1, 0, 2, 3)
                center = int(self.num_points // 2)
                x_offset_new[center] = 0
                for index in range(1, center):
                    x_offset_new[center + index] = (x_offset_new[center + index - 1] + x_offset[center + index])
                    x_offset_new[center - index] = (x_offset_new[center - index + 1] + x_offset[center - index])
                x_offset_new = x_offset_new.permute(1, 0, 2, 3).to(device)
                x_new = x_new.add(x_offset_new.mul(self.extend_scope))

            y_new = y_new.reshape(
                [self.num_batch, 1, self.num_points, self.width, self.height])
            y_new = y_new.permute(0, 3, 1, 4, 2)
            y_new = y_new.reshape([
                self.num_batch, 1 * self.width, self.num_points * self.height
            ])
            x_new = x_new.reshape(
                [self.num_batch, 1, self.num_points, self.width, self.height])
            x_new = x_new.permute(0, 3, 1, 4, 2)
            x_new = x_new.reshape([
                self.num_batch, 1 * self.width, self.num_points * self.height
            ])
            return y_new, x_new

    """
    input: input feature map [N,C,D,W,H];coordinate map [N,K*D,K*W,K*H]
    output: [N,1,K*D,K*W,K*H]  deformed feature map
    """

    def _bilinear_interpolate_3D(self, input_feature, y, x):
        device = input_feature.device
        y = y.reshape([-1]).float()
        x = x.reshape([-1]).float()

        zero = torch.zeros([]).int()
        max_y = self.width - 1
        max_x = self.height - 1

        # find 8 grid locations
        y0 = torch.floor(y).int()
        y1 = y0 + 1
        x0 = torch.floor(x).int()
        x1 = x0 + 1

        # clip out coordinates exceeding feature map volume
        y0 = torch.clamp(y0, zero, max_y)
        y1 = torch.clamp(y1, zero, max_y)
        x0 = torch.clamp(x0, zero, max_x)
        x1 = torch.clamp(x1, zero, max_x)

        input_feature_flat = input_feature.flatten()
        input_feature_flat = input_feature_flat.reshape(
            self.num_batch, self.num_channels, self.width, self.height)
        input_feature_flat = input_feature_flat.permute(0, 2, 3, 1)
        input_feature_flat = input_feature_flat.reshape(-1, self.num_channels)
        dimension = self.height * self.width

        base = torch.arange(self.num_batch) * dimension
        base = base.reshape([-1, 1]).float()

        repeat = torch.ones([self.num_points * self.width * self.height
                             ]).unsqueeze(0)
        repeat = repeat.float()

        base = torch.matmul(base, repeat)
        base = base.reshape([-1])

        base = base.to(device)

        base_y0 = base + y0 * self.height
        base_y1 = base + y1 * self.height

        # top rectangle of the neighbourhood volume
        index_a0 = base_y0 - base + x0
        index_c0 = base_y0 - base + x1

        # bottom rectangle of the neighbourhood volume
        index_a1 = base_y1 - base + x0
        index_c1 = base_y1 - base + x1

        # get 8 grid values
        value_a0 = input_feature_flat[index_a0.type(torch.int64)].to(device)
        value_c0 = input_feature_flat[index_c0.type(torch.int64)].to(device)
        value_a1 = input_feature_flat[index_a1.type(torch.int64)].to(device)
        value_c1 = input_feature_flat[index_c1.type(torch.int64)].to(device)

        # find 8 grid locations
        y0 = torch.floor(y).int()
        y1 = y0 + 1
        x0 = torch.floor(x).int()
        x1 = x0 + 1

        # clip out coordinates exceeding feature map volume
        y0 = torch.clamp(y0, zero, max_y + 1)
        y1 = torch.clamp(y1, zero, max_y + 1)
        x0 = torch.clamp(x0, zero, max_x + 1)
        x1 = torch.clamp(x1, zero, max_x + 1)

        x0_float = x0.float()
        x1_float = x1.float()
        y0_float = y0.float()
        y1_float = y1.float()

        vol_a0 = ((y1_float - y) * (x1_float - x)).unsqueeze(-1).to(device)
        vol_c0 = ((y1_float - y) * (x - x0_float)).unsqueeze(-1).to(device)
        vol_a1 = ((y - y0_float) * (x1_float - x)).unsqueeze(-1).to(device)
        vol_c1 = ((y - y0_float) * (x - x0_float)).unsqueeze(-1).to(device)

        outputs = (value_a0 * vol_a0 + value_c0 * vol_c0 + value_a1 * vol_a1 +
                   value_c1 * vol_c1)

        if self.morph == 0:
            outputs = outputs.reshape([
                self.num_batch,
                self.num_points * self.width,
                1 * self.height,
                self.num_channels,
            ])
            outputs = outputs.permute(0, 3, 1, 2)
        else:
            outputs = outputs.reshape([
                self.num_batch,
                1 * self.width,
                self.num_points * self.height,
                self.num_channels,
            ])
            outputs = outputs.permute(0, 3, 1, 2)
        return outputs

    def deform_conv(self, input, offset, if_offset):
        y, x = self._coordinate_map_3D(offset, if_offset)
        deformed_feature = self._bilinear_interpolate_3D(input, y, x)
        return deformed_feature


class Bottleneck(nn.Module):
    """Standard bottleneck."""

    def __init__(self, c1, c2, shortcut=True, g=1, k=(3, 3), e=0.5):
        """Initializes a bottleneck module with given input/output channels, shortcut option, group, kernels, and
        expansion.
        """
        super().__init__()
        c_ = int(c2 * e)  # hidden channels
        self.cv1 = Conv(c1, c_, k[0], 1)
        self.cv2 = Conv(c_, c2, k[1], 1, g=g)
        self.add = shortcut and c1 == c2

    def forward(self, x):
        """'forward()' applies the YOLO FPN to input data."""
        return x + self.cv2(self.cv1(x)) if self.add else self.cv2(self.cv1(x))


class Bottleneck_DySnakeConv(Bottleneck):
    """Standard bottleneck with DySnakeConv."""

    def __init__(self, c1, c2, shortcut=True, g=1, k=(3, 3), e=0.5):  # ch_in, ch_out, shortcut, groups, kernels, expand
        super().__init__(c1, c2, shortcut, g, k, e)
        c_ = int(c2 * e)  # hidden channels
        self.cv2 = DySnakeConv(c_, c2, k[1])
        self.cv3 = Conv(c2 * 3, c2, k=1)

    def forward(self, x):
        """'forward()' applies the YOLOv5 FPN to input data."""
        return x + self.cv3(self.cv2(self.cv1(x))) if self.add else self.cv3(self.cv2(self.cv1(x)))


class C2f_DSConv(nn.Module):
    """Faster Implementation of CSP Bottleneck with 2 convolutions."""

    def __init__(self, c1, c2, n=1, shortcut=False, g=1, e=0.5):
        """Initialize CSP bottleneck layer with two convolutions with arguments ch_in, ch_out, number, shortcut, groups,
        expansion.
        """
        super().__init__()
        self.c = int(c2 * e)  # hidden channels
        self.cv1 = Conv(c1, 2 * self.c, 1, 1)
        self.cv2 = Conv((2 + n) * self.c, c2, 1)  # optional act=FReLU(c2)
        self.m = nn.ModuleList(Bottleneck_DySnakeConv(self.c, self.c, shortcut, g, k=(3, 3), e=1.0) for _ in range(n))

    def forward(self, x):
        """Forward pass through C2f layer."""
        y = list(self.cv1(x).chunk(2, 1))
        y.extend(m(y[-1]) for m in self.m)
        return self.cv2(torch.cat(y, 1))

    def forward_split(self, x):
        """Forward pass using split() instead of chunk()."""
        y = list(self.cv1(x).split((self.c, self.c), 1))
        y.extend(m(y[-1]) for m in self.m)
return self.cv2(torch.cat(y, 1))六、需要改动代码的地方
6.1 添加步骤
6.1.1 步骤一
首先我们找到如下的目录'ultralytics/nn/modules',然后在这个目录下创建一个py文件,名字可以根据你自己的习惯起,然后将DSConv的核心代码复制进去。
6.1.2 步骤二
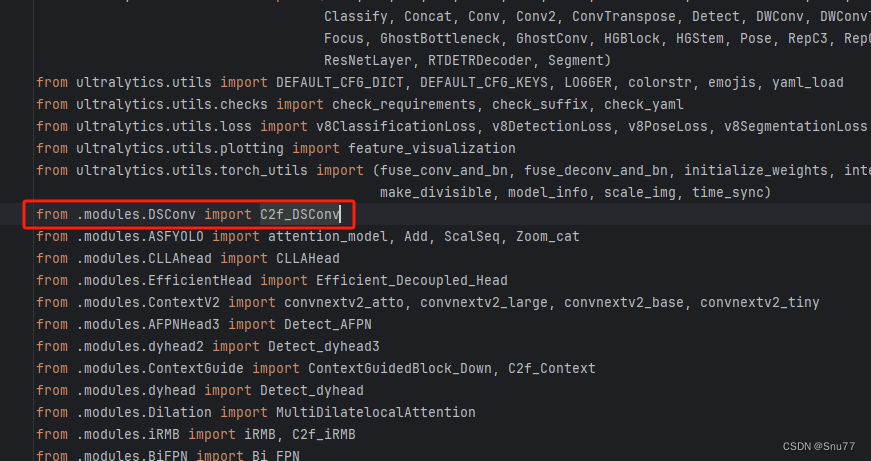
之后我们找到'ultralytics/nn/tasks.py'文件,在其中注册我们的MLCA和C2f_MLCA模块。
首先我们需要在文件的开头导入我们的MLCA和C2f_MLCA模块,如下图所示->
6.1.3 步骤三
我们找到parse_model这个方法,可以用搜索也可以自己手动找,大概在六百多行吧。 我们找到如下的地方,然后将我导入的模块添加进去即可,模仿我添加即可(需要注意的是该卷积不可替换主干上的卷积,该卷积的构造比较特殊)。
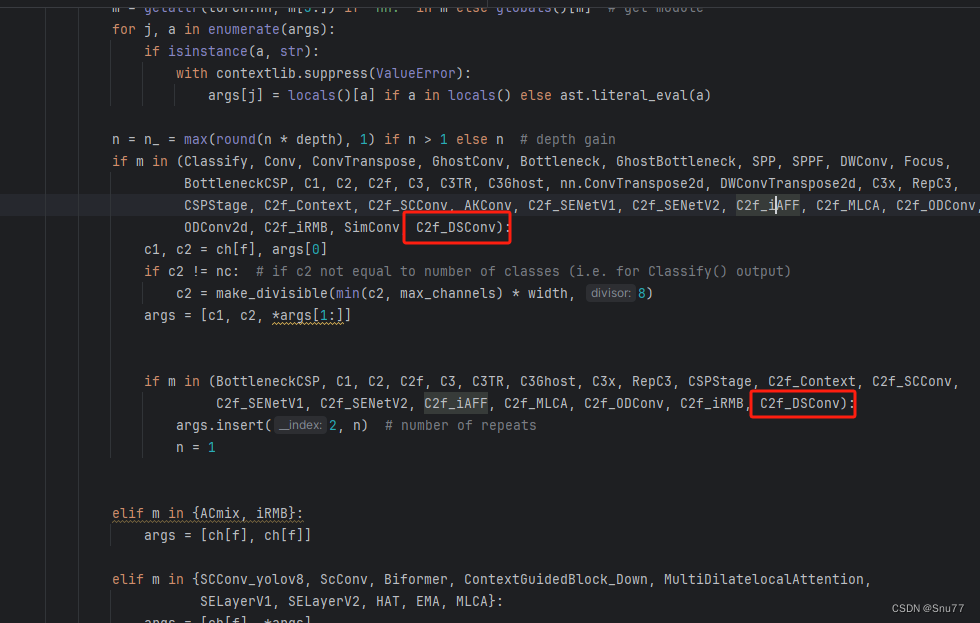
到此我们就注册成功了,可以修改yaml文件中输入MLCA和C2f_MLCA使用这个模块了。
七、DSConv的yaml文件和运行记录
7.1 DSConv的yaml文件一
下面的添加DSConv是我实验结果的版本。
python
# Ultralytics YOLO 🚀, AGPL-3.0 license
# YOLOv8 object detection model with P3-P5 outputs. For Usage examples see https://docs.ultralytics.com/tasks/detect

# Parameters
nc: 80  # number of classes
scales: # model compound scaling constants, i.e. 'model=yolov8n.yaml' will call yolov8.yaml with scale 'n'
  # [depth, width, max_channels]
  n: [0.33, 0.25, 1024]  # YOLOv8n summary: 225 layers,  3157200 parameters,  3157184 gradients,   8.9 GFLOPs
  s: [0.33, 0.50, 1024]  # YOLOv8s summary: 225 layers, 11166560 parameters, 11166544 gradients,  28.8 GFLOPs
  m: [0.67, 0.75, 768]   # YOLOv8m summary: 295 layers, 25902640 parameters, 25902624 gradients,  79.3 GFLOPs
  l: [1.00, 1.00, 512]   # YOLOv8l summary: 365 layers, 43691520 parameters, 43691504 gradients, 165.7 GFLOPs
  x: [1.00, 1.25, 512]   # YOLOv8x summary: 365 layers, 68229648 parameters, 68229632 gradients, 258.5 GFLOPs

# YOLOv8.0n backbone
backbone:
  # [from, repeats, module, args]
  - [-1, 1, Conv, [64, 3, 2]]  # 0-P1/2
  - [-1, 1, Conv, [128, 3, 2]]  # 1-P2/4
  - [-1, 3, C2f_DSConv, [128, True]]
  - [-1, 1, Conv, [256, 3, 2]]  # 3-P3/8
  - [-1, 6, C2f_DSConv, [256, True]]
  - [-1, 1, Conv, [512, 3, 2]]  # 5-P4/16
  - [-1, 6, C2f_DSConv, [512, True]]
  - [-1, 1, Conv, [1024, 3, 2]]  # 7-P5/32
  - [-1, 3, C2f_DSConv, [1024, True]]
  - [-1, 1, SPPF, [1024, 5]]  # 9

# YOLOv8.0n head
head:
  - [-1, 1, nn.Upsample, [None, 2, 'nearest']]
  - [[-1, 6], 1, Concat, [1]]  # cat backbone P4
  - [-1, 3, C2f, [512]]  # 12

  - [-1, 1, nn.Upsample, [None, 2, 'nearest']]
  - [[-1, 4], 1, Concat, [1]]  # cat backbone P3
  - [-1, 3, C2f_DSConv, [256]]  # 15 (P3/8-small)

  - [-1, 1, Conv, [256, 3, 2]]
  - [[-1, 12], 1, Concat, [1]]  # cat head P4
  - [-1, 3, C2f_DSConv, [512]]  # 18 (P4/16-medium)

  - [-1, 1, Conv, [512, 3, 2]]
  - [[-1, 9], 1, Concat, [1]]  # cat head P5
  - [-1, 3, C2f_DSConv, [1024]]  # 21 (P5/32-large)

- [[15, 18, 21], 1, Detect, [nc]] # Detect(P3, P4, P5)7.2 DSConv的yaml文件二
python
# Ultralytics YOLO 🚀, AGPL-3.0 license
# YOLOv8 object detection model with P3-P5 outputs. For Usage examples see https://docs.ultralytics.com/tasks/detect

# Parameters
nc: 80  # number of classes
scales: # model compound scaling constants, i.e. 'model=yolov8n.yaml' will call yolov8.yaml with scale 'n'
  # [depth, width, max_channels]
  n: [0.33, 0.25, 1024]  # YOLOv8n summary: 225 layers,  3157200 parameters,  3157184 gradients,   8.9 GFLOPs
  s: [0.33, 0.50, 1024]  # YOLOv8s summary: 225 layers, 11166560 parameters, 11166544 gradients,  28.8 GFLOPs
  m: [0.67, 0.75, 768]   # YOLOv8m summary: 295 layers, 25902640 parameters, 25902624 gradients,  79.3 GFLOPs
  l: [1.00, 1.00, 512]   # YOLOv8l summary: 365 layers, 43691520 parameters, 43691504 gradients, 165.7 GFLOPs
  x: [1.00, 1.25, 512]   # YOLOv8x summary: 365 layers, 68229648 parameters, 68229632 gradients, 258.5 GFLOPs

# YOLOv8.0n backbone
backbone:
  # [from, repeats, module, args]
  - [-1, 1, Conv, [64, 3, 2]]  # 0-P1/2
  - [-1, 1, Conv, [128, 3, 2]]  # 1-P2/4
  - [-1, 3, C2f, [128, True]]
  - [-1, 1, Conv, [256, 3, 2]]  # 3-P3/8
  - [-1, 6, C2f, [256, True]]
  - [-1, 1, Conv, [512, 3, 2]]  # 5-P4/16
  - [-1, 6, C2f, [512, True]]
  - [-1, 1, Conv, [1024, 3, 2]]  # 7-P5/32
  - [-1, 3, C2f, [1024, True]]
  - [-1, 1, SPPF, [1024, 5]]  # 9

# YOLOv8.0n head
head:
  - [-1, 1, nn.Upsample, [None, 2, 'nearest']]
  - [[-1, 6], 1, Concat, [1]]  # cat backbone P4
  - [-1, 3, C2f, [512]]  # 12

  - [-1, 1, nn.Upsample, [None, 2, 'nearest']]
  - [[-1, 4], 1, Concat, [1]]  # cat backbone P3
  - [-1, 3, C2f_DSConv, [256]]  # 15 (P3/8-small)

  - [-1, 1, Conv, [256, 3, 2]]
  - [[-1, 12], 1, Concat, [1]]  # cat head P4
  - [-1, 3, C2f_DSConv, [512]]  # 18 (P4/16-medium)

  - [-1, 1, Conv, [512, 3, 2]]
  - [[-1, 9], 1, Concat, [1]]  # cat head P5
  - [-1, 3, C2f_DSConv, [1024]]  # 21 (P5/32-large)

- [[15, 18, 21], 1, Detect, [nc]] # Detect(P3, P4, P5)7.3 DSConv的yaml文件三
python
# Ultralytics YOLO 🚀, AGPL-3.0 license
# YOLOv8 object detection model with P3-P5 outputs. For Usage examples see https://docs.ultralytics.com/tasks/detect

# Parameters
nc: 80  # number of classes
scales: # model compound scaling constants, i.e. 'model=yolov8n.yaml' will call yolov8.yaml with scale 'n'
  # [depth, width, max_channels]
  n: [0.33, 0.25, 1024]  # YOLOv8n summary: 225 layers,  3157200 parameters,  3157184 gradients,   8.9 GFLOPs
  s: [0.33, 0.50, 1024]  # YOLOv8s summary: 225 layers, 11166560 parameters, 11166544 gradients,  28.8 GFLOPs
  m: [0.67, 0.75, 768]   # YOLOv8m summary: 295 layers, 25902640 parameters, 25902624 gradients,  79.3 GFLOPs
  l: [1.00, 1.00, 512]   # YOLOv8l summary: 365 layers, 43691520 parameters, 43691504 gradients, 165.7 GFLOPs
  x: [1.00, 1.25, 512]   # YOLOv8x summary: 365 layers, 68229648 parameters, 68229632 gradients, 258.5 GFLOPs

# YOLOv8.0n backbone
backbone:
  # [from, repeats, module, args]
  - [-1, 1, Conv, [64, 3, 2]]  # 0-P1/2
  - [-1, 1, Conv, [128, 3, 2]]  # 1-P2/4
  - [-1, 3, C2f, [128, True]]
  - [-1, 1, Conv, [256, 3, 2]]  # 3-P3/8
  - [-1, 6, C2f, [256, True]]
  - [-1, 1, Conv, [512, 3, 2]]  # 5-P4/16
  - [-1, 6, C2f, [512, True]]
  - [-1, 1, Conv, [1024, 3, 2]]  # 7-P5/32
  - [-1, 3, C2f, [1024, True]]
  - [-1, 1, SPPF, [1024, 5]]  # 9

# YOLOv8.0n head
head:
  - [-1, 1, nn.Upsample, [None, 2, 'nearest']]
  - [[-1, 6], 1, Concat, [1]]  # cat backbone P4
  - [-1, 3, C2f, [512]]  # 12

  - [-1, 1, nn.Upsample, [None, 2, 'nearest']]
  - [[-1, 4], 1, Concat, [1]]  # cat backbone P3
  - [-1, 3, C2f_DSConv, [256]]  # 15 (P3/8-small)

  - [-1, 1, Conv, [256, 3, 2]]
  - [[-1, 12], 1, Concat, [1]]  # cat head P4
  - [-1, 3, C2f_DSConv, [512]]  # 18 (P4/16-medium)

  - [-1, 1, Conv, [512, 3, 2]]
  - [[-1, 9], 1, Concat, [1]]  # cat head P5
  - [-1, 3, C2f_DSConv, [1024]]  # 21 (P5/32-large)

- [[15, 18, 21], 1, Detect, [nc]] # Detect(P3, P4, P5)7.4 DSConv的训练过程截图
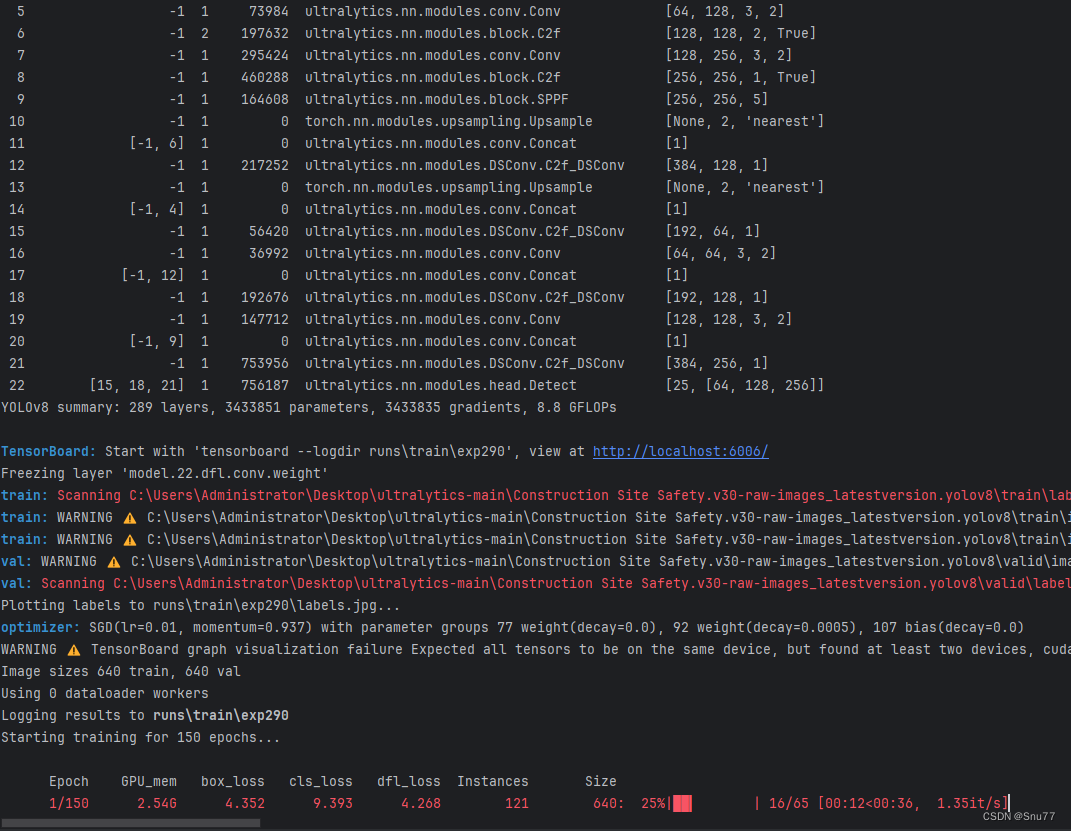
下面是添加了DSConv的训练截图。
大家可以看下面的运行结果和添加的位置所以不存在我发的代码不全或者运行不了的问题大家有问题也可以在评论区评论我看到都会为大家解答(我知道的)。